The Great Restrictor: Mastering Resistance & Ohm's Law
Stop burning out your LEDs. Master electrical resistance, Ohm's Law calculations, and build your first protected circuit in Day 3 of our Electronics series.
Read More →
* SYSTEM.NOTICE: Affiliate links support continued laboratory research.
Welcome.
If you are reading this, you are standing at the edge of a rabbit hole that goes deeper than you can possibly imagine. You might be here because you saw a cool robot on YouTube, or perhaps you want to fix a broken retro console, or maybe you just want to understand how the phone in your pocket actually works instead of just treating it like a magic slab of glass.
Whatever your reason, you are in the right place.
This is Day 1.
Before we solder a single wire or write a single line of code, we need to address the elephant in the room. The thing that stops 90% of people from ever getting started working with hardware.
The Fear.
The fear that you will break something expensive. The fear that you will buy the wrong parts. The fear that the math is too hard. And, mostly, the fear that you will zap yourself.
Today, we are going to dismantle those fears, one by one. We are going to learn the language of electricity, and by the end of this post, you will understand exactly what it means to be an “Electronics Hobbyist” in 2026.
This series is not for PhD students (though they might enjoy the review).
To understand where we are, we have to look back. 100 years ago, electronic devices were heavy, hot, and fragile. We used Vacuum Tubes—glass bulbs that looked like lightbulbs but acted like switches. They powered the first radios and computers. The first computer, ENIAC, had 18,000 of them and took up an entire room. When a moth flew into a circuit and shorted it out, it became the first literal computer “bug” (though famously found in a relay-based machine).
Then came the Transistor in 1947. This changed everything. It did the same job as the tube but was tiny, cold, and reliable. Then, engineers realized they could print thousands of transistors onto a single wafer of silicon. The Integrated Circuit (IC) was born.
Today, the ESP32 chip we will use later in this series costs \2$ and contains millions of transistors. It is more powerful than the computer that guided Apollo 11 to the moon. You are holding that power in your hand.
It sounds like a simple question, doesn’t it? “It’s stuff with wires.” But we must distinguish it from its big brother.
We use the words “Electricity” and “Electronics” almost interchangeably in daily life, but to an engineer, they are two completely different worlds.
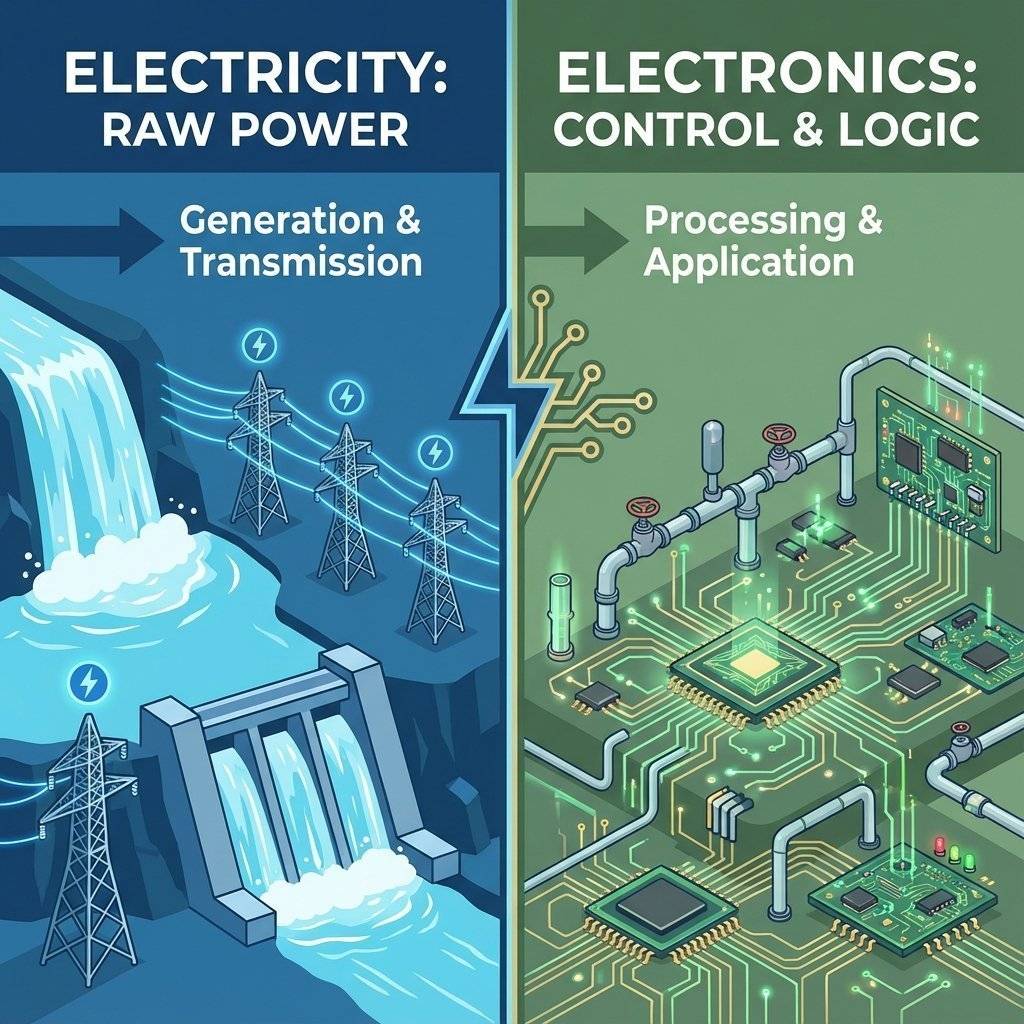
Imagine a rushing river.
Electricity is the water itself. It is the raw power. It is the force that turns the water wheel, grinds the wheat, and lights up the city. When you plug a heater into the wall, that is Electrical Engineering. You are using the raw energy of electrons to create heat (work). It is brute force. It is high power. It is dangerous if uncontrolled.
Electronics, on the other hand, is not about the power. It is about the control.
In our river analogy, Electronics is not the water. It is the series of gates, valves, sensors, and canals that direct the water to specific places at specific times.
When you build a circuit to blink an LED, you aren’t just dumping power into a lightbulb. You are using components to tell the electrons: “Go here, stop there, wait 1 second, then go again.”
You are controlling the flow. You are handling information. This distinction is crucial because it changes how you look at circuits. You aren’t just connecting pipes; you are building a system of logic.
If you take nothing else away from today, take this. These are the three pillars of our universe. You cannot escape them. You must understand them.
We use the “Water Analogy” because, remarkably, electrons behave very similarly to water in a pipe.
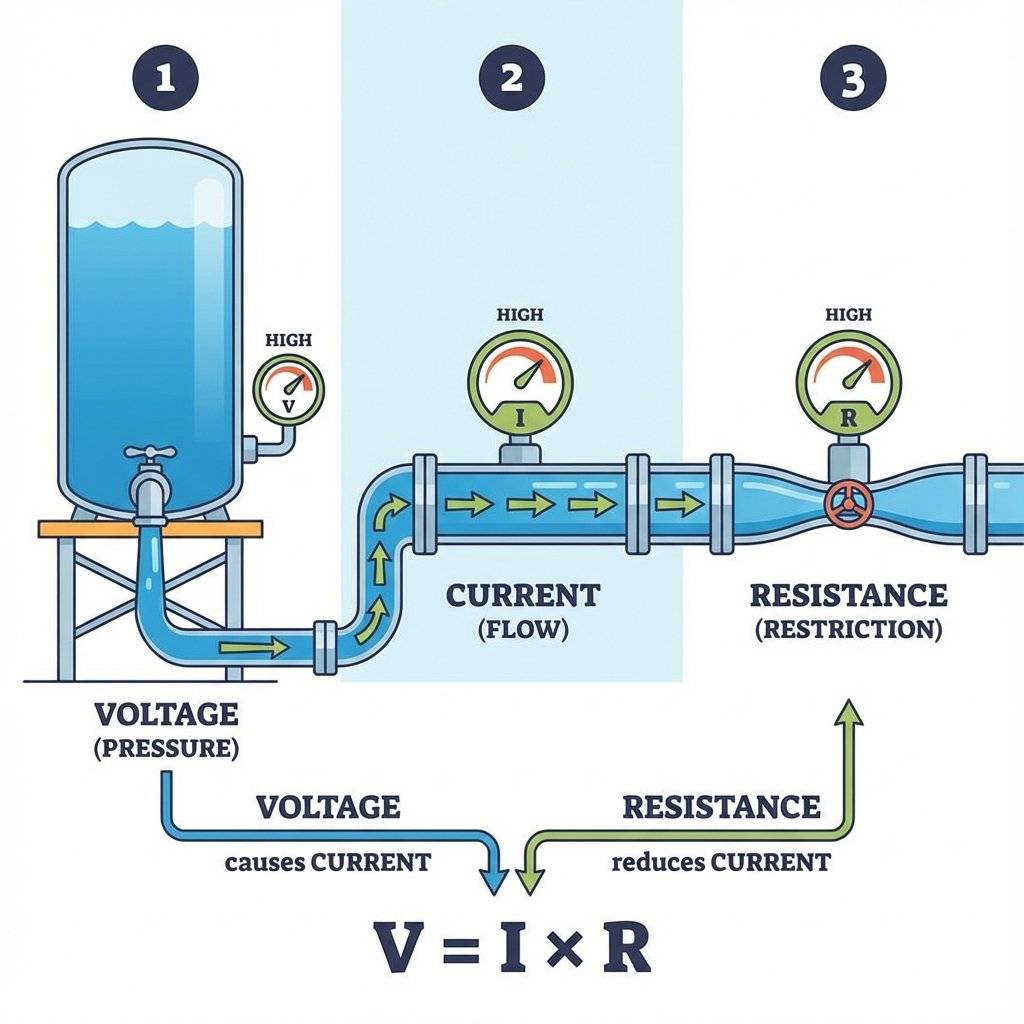
Voltage is the push. It is the potential energy.
Imagine a water tank on top of a hill. The higher the tank, the more pressure the water has at the bottom.
If there is no pipe connected, the pressure is still there. A battery sitting on a shelf has Voltage, even if it’s doing nothing.
Symbol: V Unit:
Current is the amount of water actually flowing through the pipe.
You can have high pressure (Voltage) with zero flow (Current) if the tap is closed. This is exactly what a battery sitting on your desk is: High potential energy, zero current flow. But once you open the tap (complete the circuit), the water flows. The volume of water moving past a point every second is the Current.
In electronics, this flow is the physical movement of electrons through the copper wire.
Symbol: I (from the French Intensité) Unit:
Resistance is what fights back. It is the friction.
A wide, smooth pipe lets water flow easily (Low Resistance). A skinny, clogged pipe makes it hard for water to flow (High Resistance).
If you have a fixed amount of pressure (Voltage), the only way to change the flow (Current) is to change the pipe size (Resistance).
Symbol: R (or , Omega) Unit: Ohms
These three are locked in a permanent mathematical dance. You cannot change one without affecting the others.
Voltage = Current Resistance ()
We will cover the math later. For now, just understand the relationship:
It is intuitive. If you push harder, it moves faster. If you block the path, it moves slower.
Let’s talk about getting shocked.
“It’s not the voltage that kills you, it’s the current!”
You have probably heard this saying. It is techno-babble that gets repeated in forums and comments sections constantly. It is technically true, but practically misleading. It implies you don’t need to fear voltage.
Here is the reality for the Beginner:
AC (Alternating Current) from your wall ( in US, in Europe/Asia) is dangerous. It has high voltage AND the capacity to deliver massive current. It creates a path through your body to the ground. Rule #1: In this course, we will NEVER touch mains voltage directly. We will always use power supplies (like USB wall bricks) that step it down to safe levels before we touch it. We stay on the “Low Voltage Side”.
Most of our projects will run on (USB standard) or . You can touch the positive and negative terminals of a circuit with your bare hands. You can lick a battery (we all have). It tingles, but it won’t stop your heart. Why? Remember Ohm’s Law? . Your body has very high resistance (dry skin is roughly ). If you take , the resulting current is microscopic. It cannot harm you.
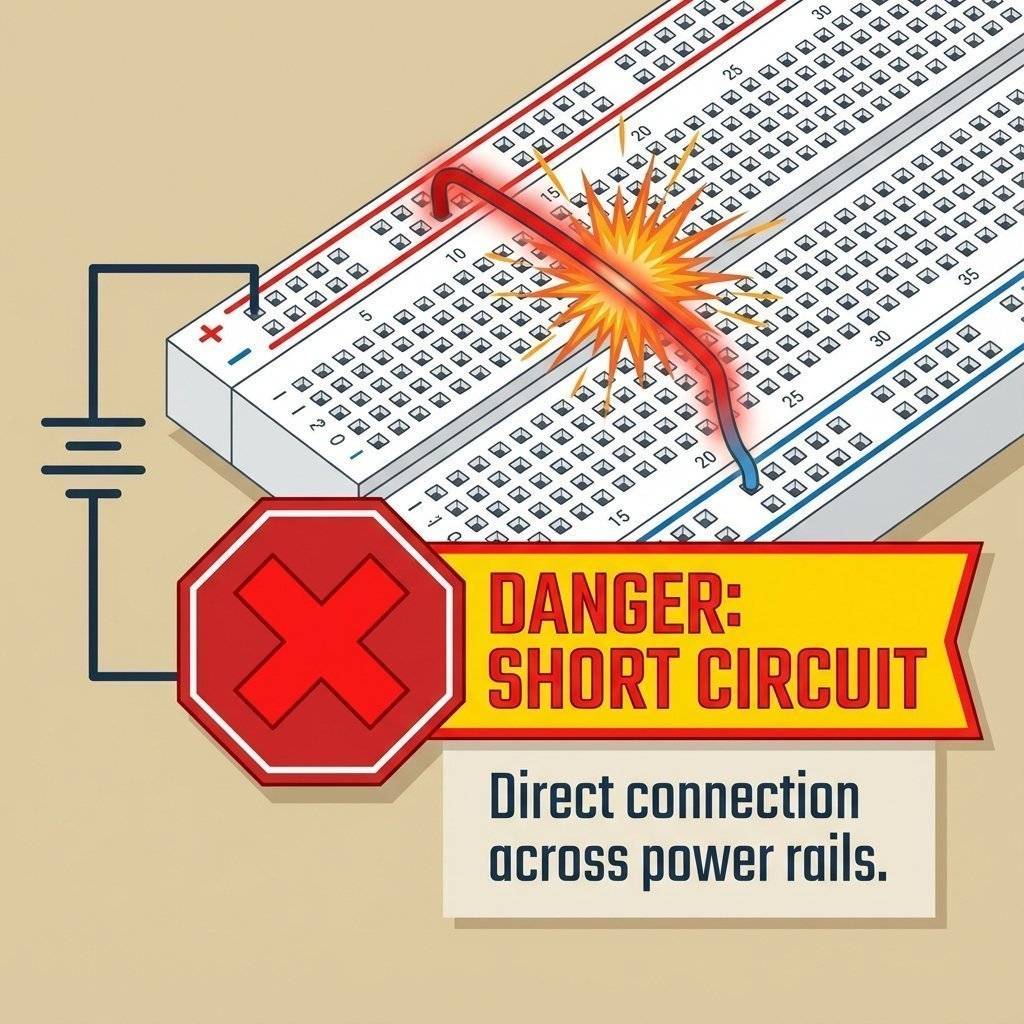
The real danger in beginner electronics is not hurting yourself, it’s burning your house down (or just your table). If you connect the Positive (+) wire of a battery directly to the Negative (-) wire with no resistance in between…
This is a “Short Circuit”. It is the most common mistake you will make. Always check your connections before turning on the power.
Before we build circuits, we need to know how to read them. Beginners love Fritzing diagrams (those colorful pictures of wires), but Engineers use Schematics.
Why? Because pictures get messy. Schematics are clean. A Schematic is a logical map of the connections, not a physical map of where components are placed.
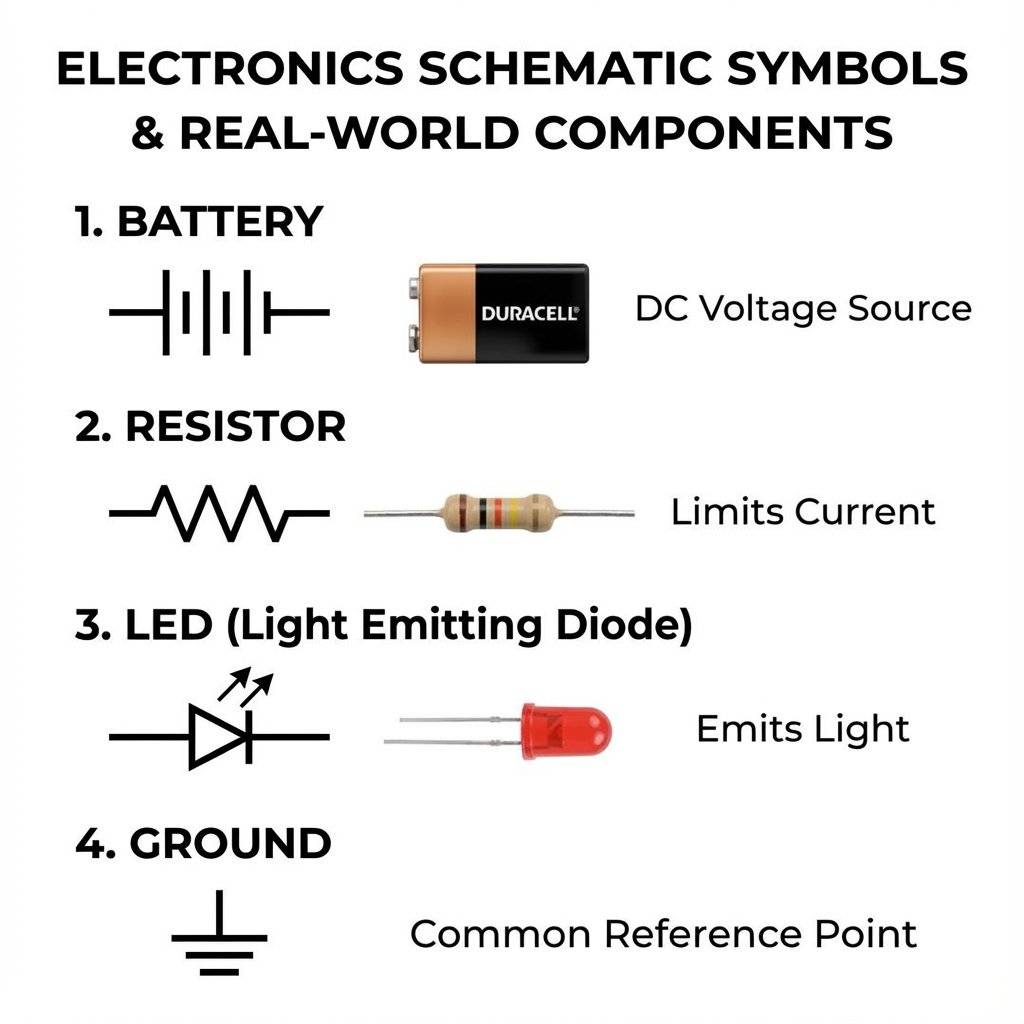
The Battery: Drawn as two parallel lines, one shorter and thicker (Negative), one longer and thinner (Positive). The longer line is the “Plus” side.
The Resistor: A squiggly zig-zag line. It represents the difficulty electrons face.
The LED: A triangle pointing against a line, with two small arrows pointing away (representing light coming out). The direction of the triangle shows which way the current flows.
Ground (GND): Three lines decreasing in size. This is the universal reference point. The drain.
Learning to read these symbols is like learning to read music. At first, it’s just dots and lines. Soon, you will hear the symphony. We will practice this every single day starting tomorrow.
Developing the skillset is easy. Developing the mindset is hard.
When you start building, things will not work. This is a guarantee. You will build the circuit exactly as the diagram shows. You will copy the code exactly. And nothing will happen.
The average person gets frustrated. “I am stupid,” they think. “This is too hard.”
The Engineer gets curious. “Why?” they ask.
Troubleshooting is the job. Building the thing is only 20% of the work. Fixing the thing you just built is the other 80%. When an LED doesn’t light up, it is a mystery waiting to be solved.
You must learn to love the problem. The dopamine rush you get when you finally find that loose wire and the system springs to life is the drug that keeps us all coming back.
Don’t go out and buy a $500 oscilloscope. Not yet. For the first month of your journey, your lab can fit in a shoebox.
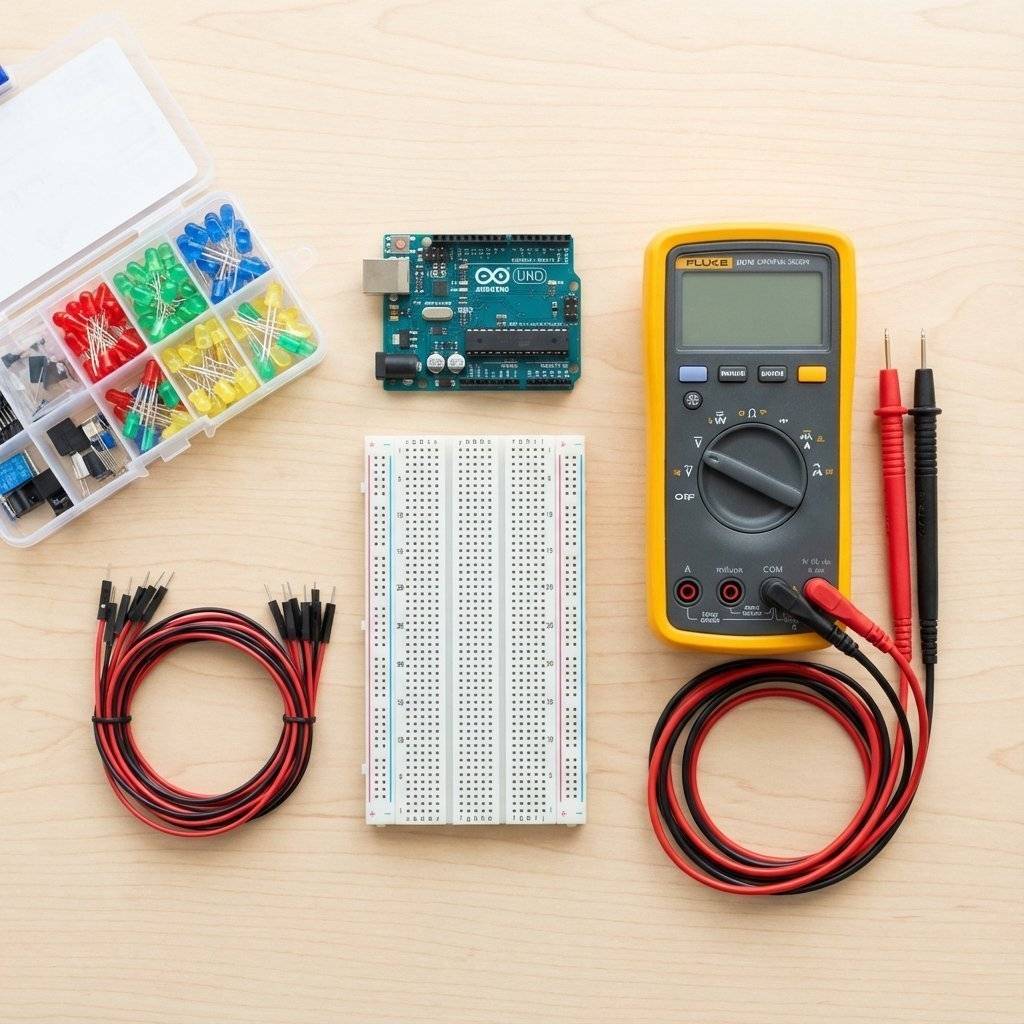
Here is the essential “Day 1” checklist, broken down:
Any laptop from the last 10 years is fine. Windows, Mac, or Linux. As long as it has a USB port, you are good to go.
We will be using the ESP32 in this series.
Why ESP32? It is cheap ($5), powerful, and has built-in WiFi and Bluetooth.
What about Arduino Uno? The classic. Great for learning, but lack of WiFi limits you quickly. We will focus on ESP32 as it is the future standard.
What about Raspberry Pi? That is a full computer (Linux). It takes 30 seconds to boot. A microcontroller boots instantly. We use controllers for hardware, computers for processing.
This is a white plastic board with a grid of holes.
The Magic: It lets you plug wires in and out without soldering.
How it works: The side rails run vertically (for power). The middle rows run horizontally (for components).
Recommendation: Get a clear one if you can, so you can see the metal clips inside.

You need “Male-to-Male” (pin to pin) and “Male-to-Female” (pin to socket) wires. Get the multicolor ribbon cables. They help you stay organized (Red for Power, Black for Ground, Blue for Data).
You need a bag of generic 5mm LEDs and a pack of resistors.
This is non-negotiable. It helps you see the invisible.
Auto-ranging vs Manual: Get an Auto-ranging meter. It saves you from having to select the specific dial setting for “20V” vs “200V”.
Continuity Mode: This makes a “Beep” sound when two probes touch. It is the single most useful feature for finding broken wires.
You don’t need a garage. A corner of a desk is enough.
Light: Get a bright desk lamp. Electronics parts are tiny. Reading the text on a resistor is impossible in the dark.
Surface: Use a cutting mat or a silicone soldering mat. It protects your table from scratches and burns (later).
Organization: Small plastic bins are your friend. A messy desk leads to lost parts and short circuits.
We have 364 posts left after this one. By the end of this year, if you stick with us, you won’t just be blinking LEDs.
But it all starts here. It starts with understanding that you are now a wizard in training. You are learning to control the invisible forces of the universe to do your bidding.
Q: Do I need to be good at math? A: No. Basic addition and multiplication are enough for 99% of hobbyist electronics. If you can calculate the tip at a restaurant, you can calculate a resistor value. The computer does the hard stuff for us.
Q: Can I electrocute myself with an Arduino? A: No. The voltage is too low to penetrate your skin. Just don’t swallow it. (Seriously, don’t swallow components; they often contain lead or other substances you shouldn’t ingest).
Q: Is soldering hard? A: It requires finesse, like writing with a pen. We will cover it later in the series, but you can go months without ever touching a soldering iron by using a breadboard.
Q: Which programming language should I learn? A: We will focus on C++ (for Arduino/ESP32) and maybe some MicroPython. C++ is the industry standard for microcontrollers. It gives you the most control. Don’t worry, we will start from scratch.
Q: Is it expensive? A: You can get a full starter kit for the price of a video game ($50-$60). The hobby is very scalable.
Today, we didn’t build anything. But we built the foundation.
Before you sleep, try this simple scavenger hunt in your own home:
+ and - signs. Read the Voltage (usually ).Tomorrow, we stop talking and start doing. We are going to look at the Water Analogy in depth, and we are going to start visualizing circuits before we even touch a wire. We will also dissect the Breadboard to understand exactly how those hidden connection strips work.
Get your rest. The journey has just begun.
Note: This post is part of the 2026 Technochips Daily Challenge. Every day, we publish a new guide taking you from absolute beginner to hardware hero.
Before we go, let’s briefly touch on one more concept that you will hear constantly.
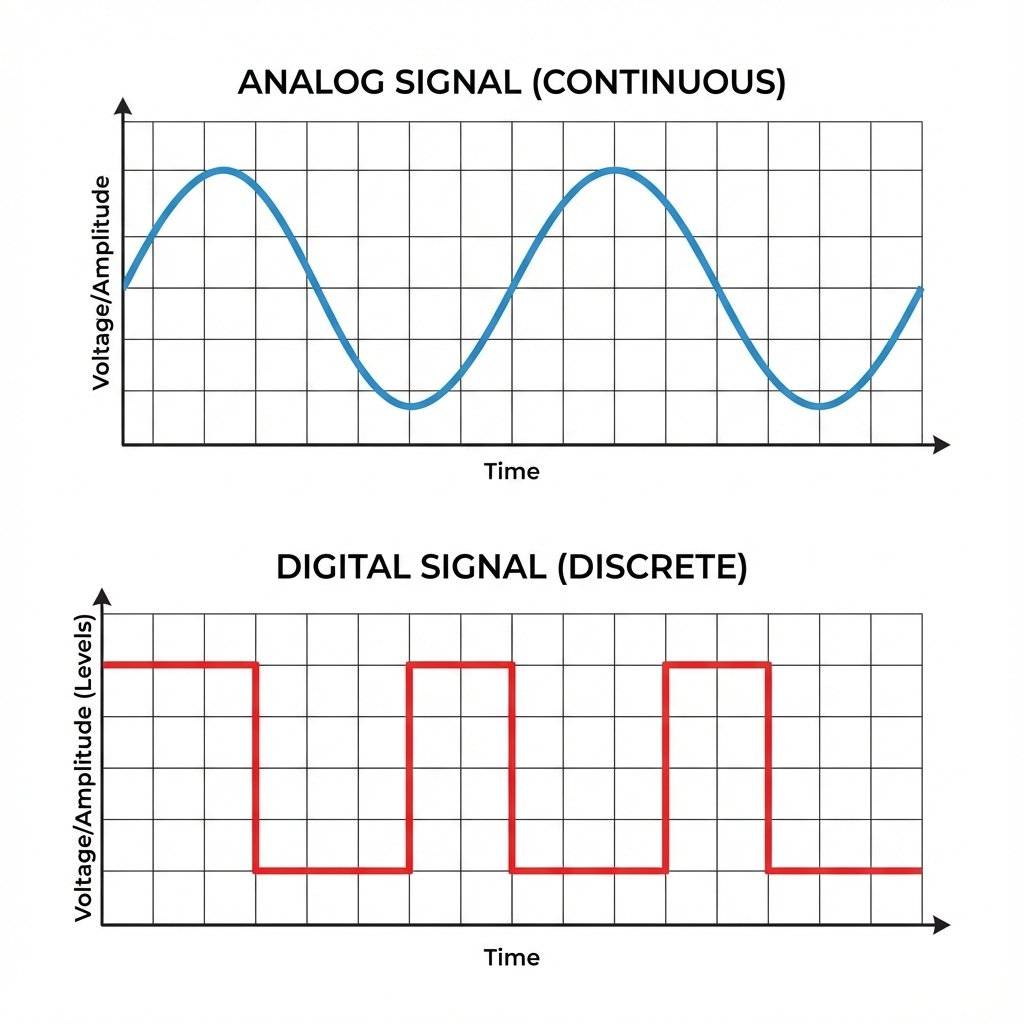
Analog is the real world. The sound of my voice is analog—it goes up and down smoothly. The temperature in the room is analog—it doesn’t jump from to , it passes through every infinite fraction in between (, , etc.). Voltage in a circuit can be analog. It can be , or , or .
Digital is the computer world. Computers don’t understand “kinda.” They only understand YES or NO. TRUE or FALSE. 1 or 0. HIGH or LOW. In our circuits:
Electronics is often about bridging these two worlds. Sensors take the Analog world (Temperature, Light, Sound) and turn it into Voltages. Our Microcontroller takes those Voltages and turns them into Digital numbers. Then it does some math, and turns them back into Analog signals to drive motors or speakers.
This conversion—ADC (Analog to Digital Converter) and DAC (Digital to Analog Converter)—is where the magic really happens. But that is a story for Day 15.
For now, just remember: The world is analog. The chip is digital. You are the translator.
As you go about your day today, look around you. Look at the microwave. The toaster. The car key fob. The traffic light. Realize that someone designed that. Someone sat down and decided exactly how much current should flow to that specific lightbulb. Someone wrote the code that checks if you pressed the “Unlock” button.
Until today, that “Someone” was a mysterious Other. From today onwards, that “Someone” is You.
See you tomorrow.
P.S. Don’t forget that buying an Arduino is the first step to building a Terminator. Proceed with caution.

Stop burning out your LEDs. Master electrical resistance, Ohm's Law calculations, and build your first protected circuit in Day 3 of our Electronics series.
Read More →
Understand electrical current like a pro. From drift velocity to safety, master the flow of electrons in Day 2 of our Analog Electronics series.
Read More →
Demystify voltage once and for all. Explore the physics, history, and practical measurement of electrical potential in this deep-dive guide for analog electronics beginners.
Read More →