From Code to Reality: Building a Production-Grade IoT Device
A complete, end-to-end guide on building a secure, scalable IoT device using ESP32, MQTT, and AWS IoT Core. We bridge the gap between software logic and hardware reality.
Read More →
* SYSTEM.NOTICE: Affiliate links support continued laboratory research.
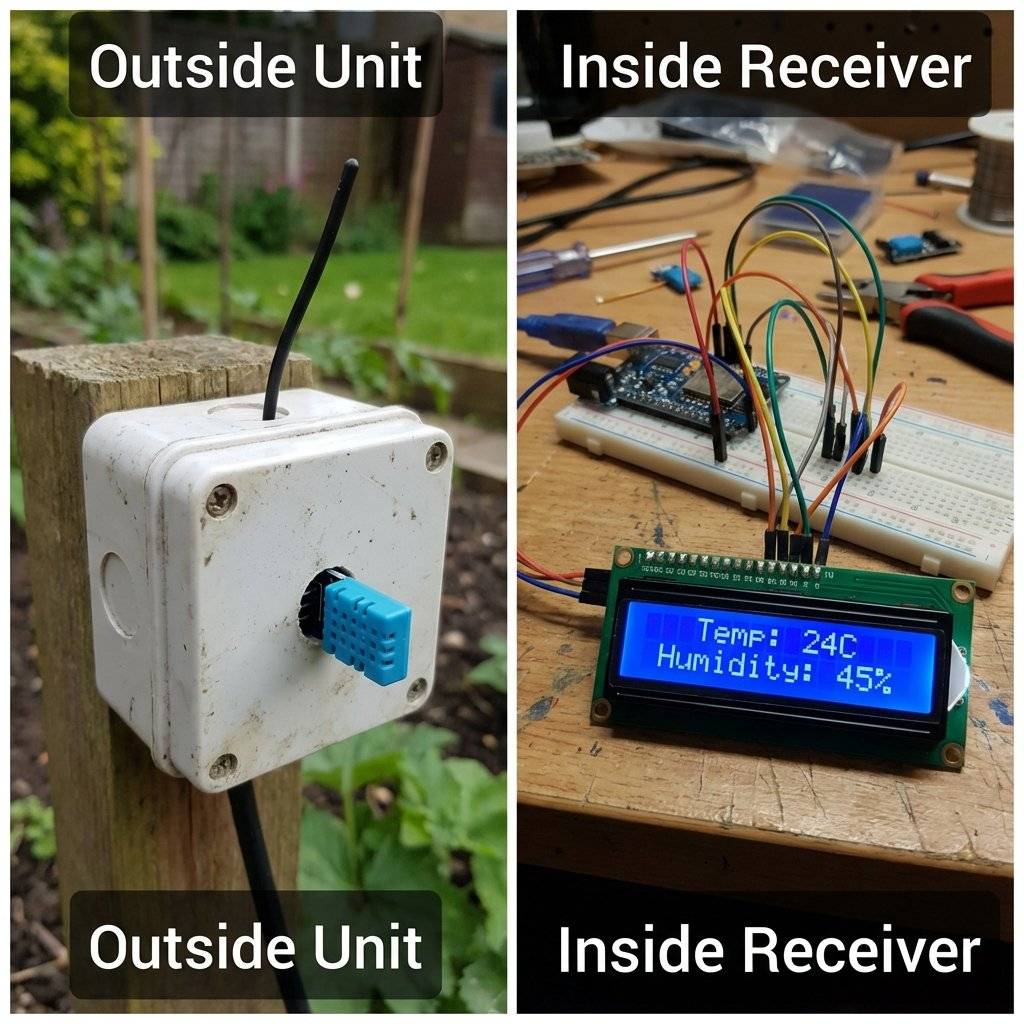
We are moving to Radio Frequency (RF). Specifically, the 433MHz band. This is the frequency used by garage door openers, wireless doorbells, and car keys. These waves don’t care about walls. They penetrate brick, wood, and drywall. By the end of this guide, you will build a Wireless Weather Station that transmits temperature data from your garden to your bedroom.
How do we send 1s and 0s through the air without Wi-Fi or Bluetooth? We use a technique called ASK (Amplitude Shift Keying). It is incredibly simple, which is why these modules cost $0.50.
It is literally Morse Code, but at 433 million times a second.
The Receiver listens. When it hears the scream, it outputs 5V. When it hears silence, it outputs 0V.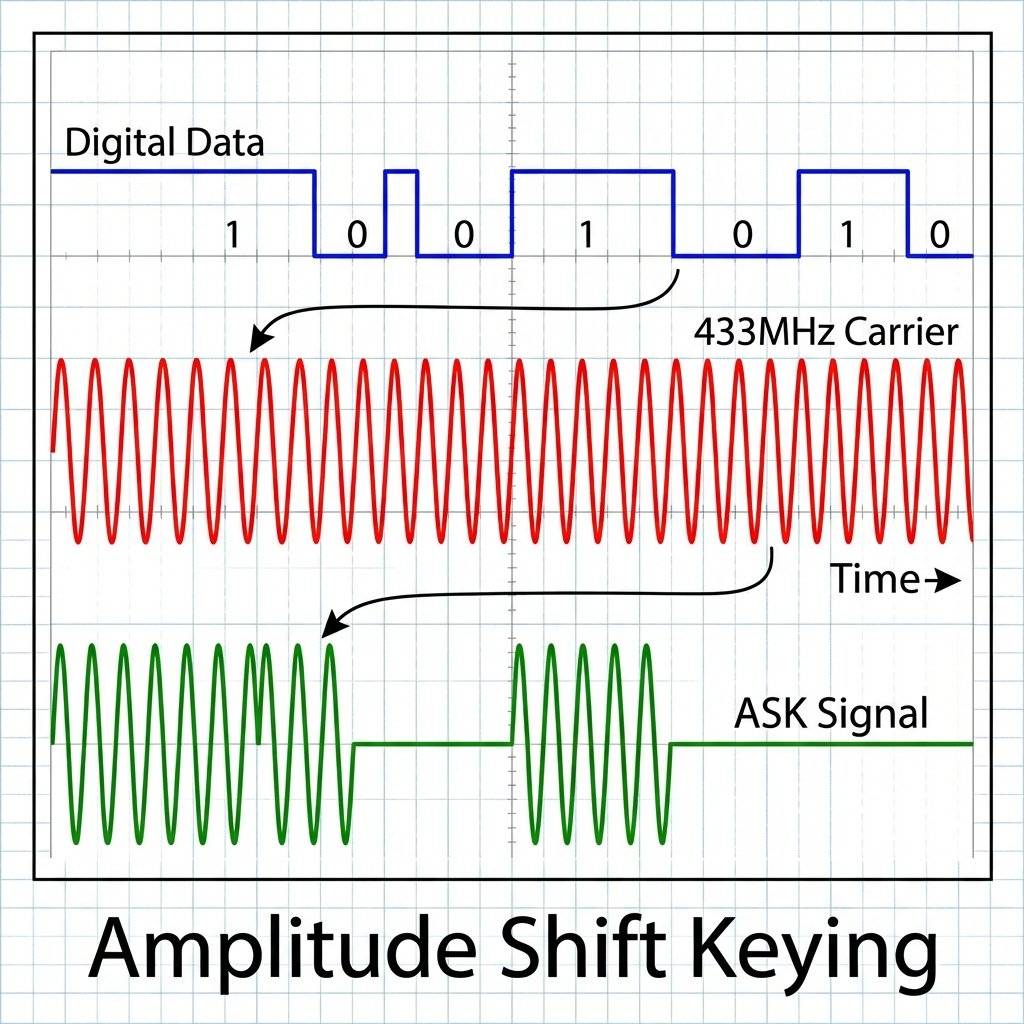
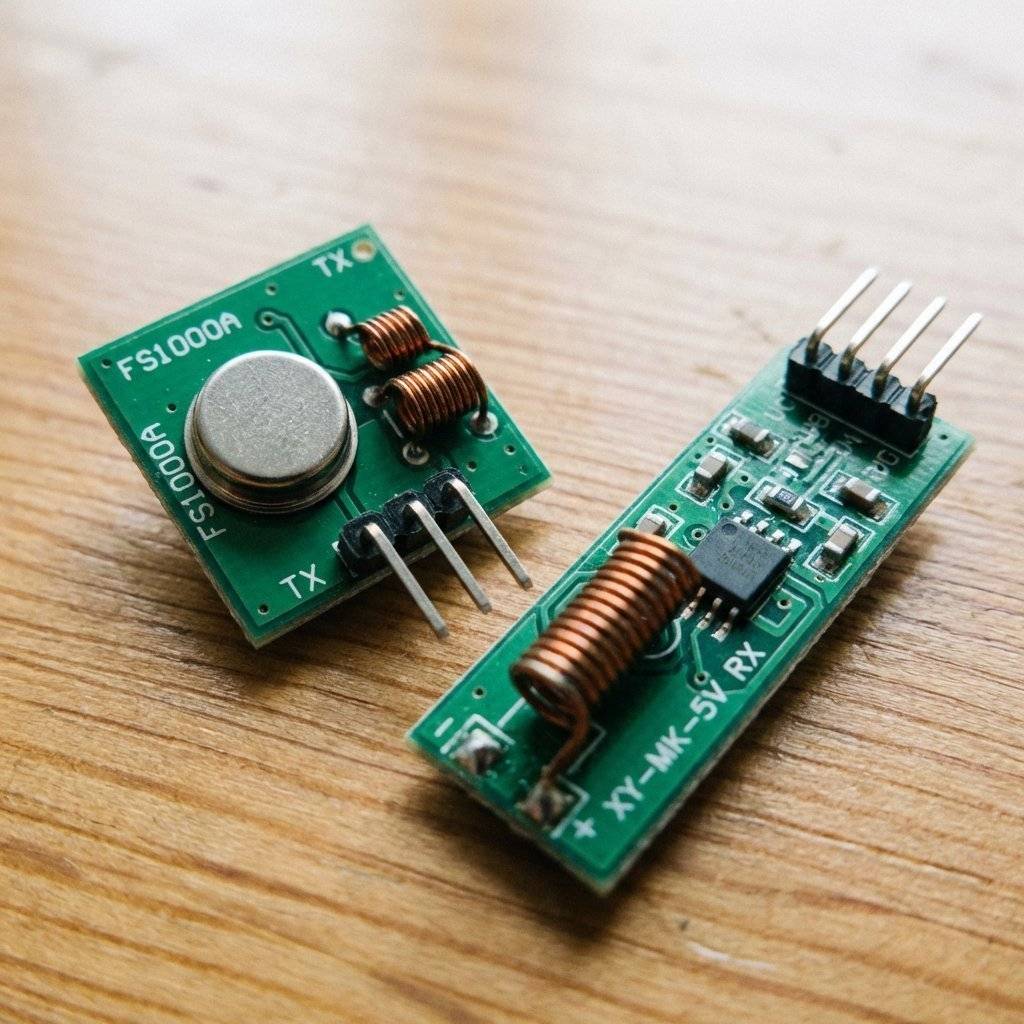
You likely bought a kit that looks like this. One square board (Transmitter) and one long rectangular board (Receiver).
This is a brute-force yelling machine.
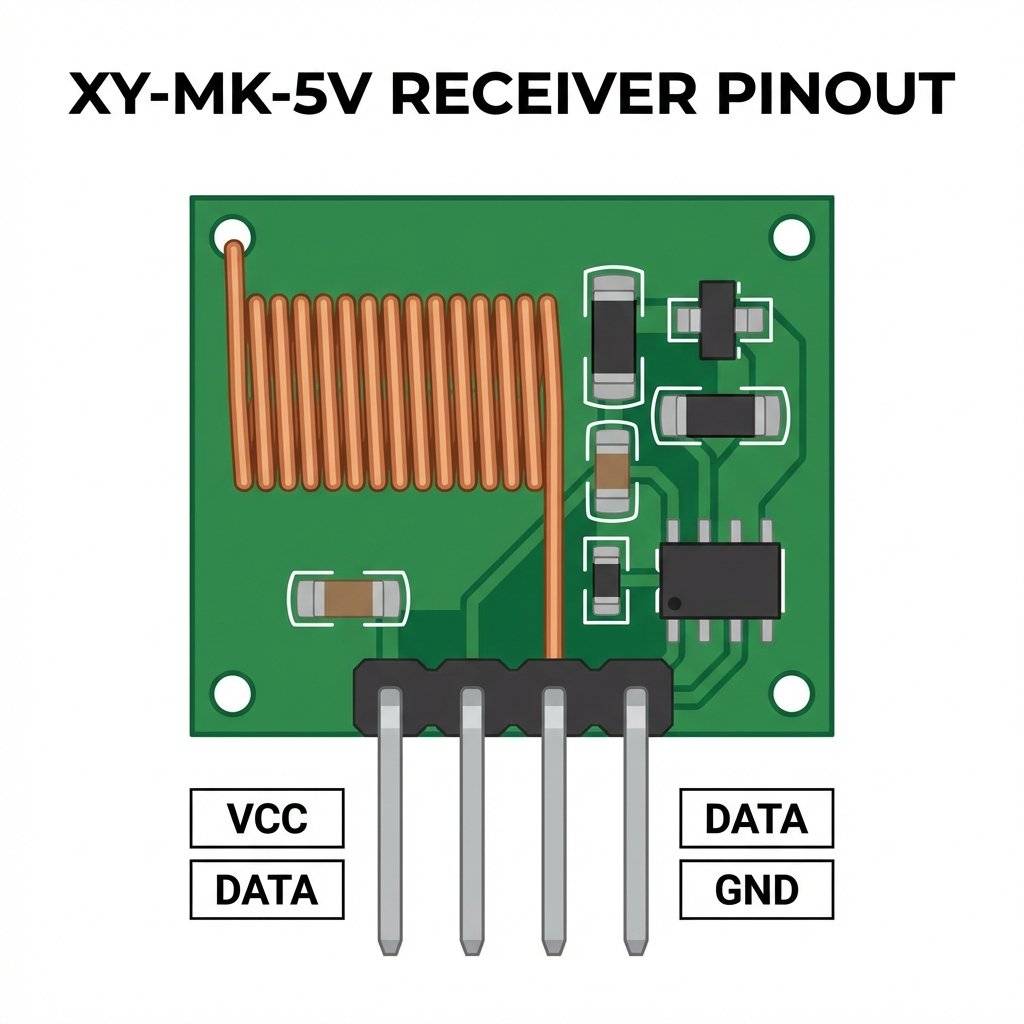
This is a sensitive listener. It has an operational amplifier (LM358) on the back to boost weak signals.
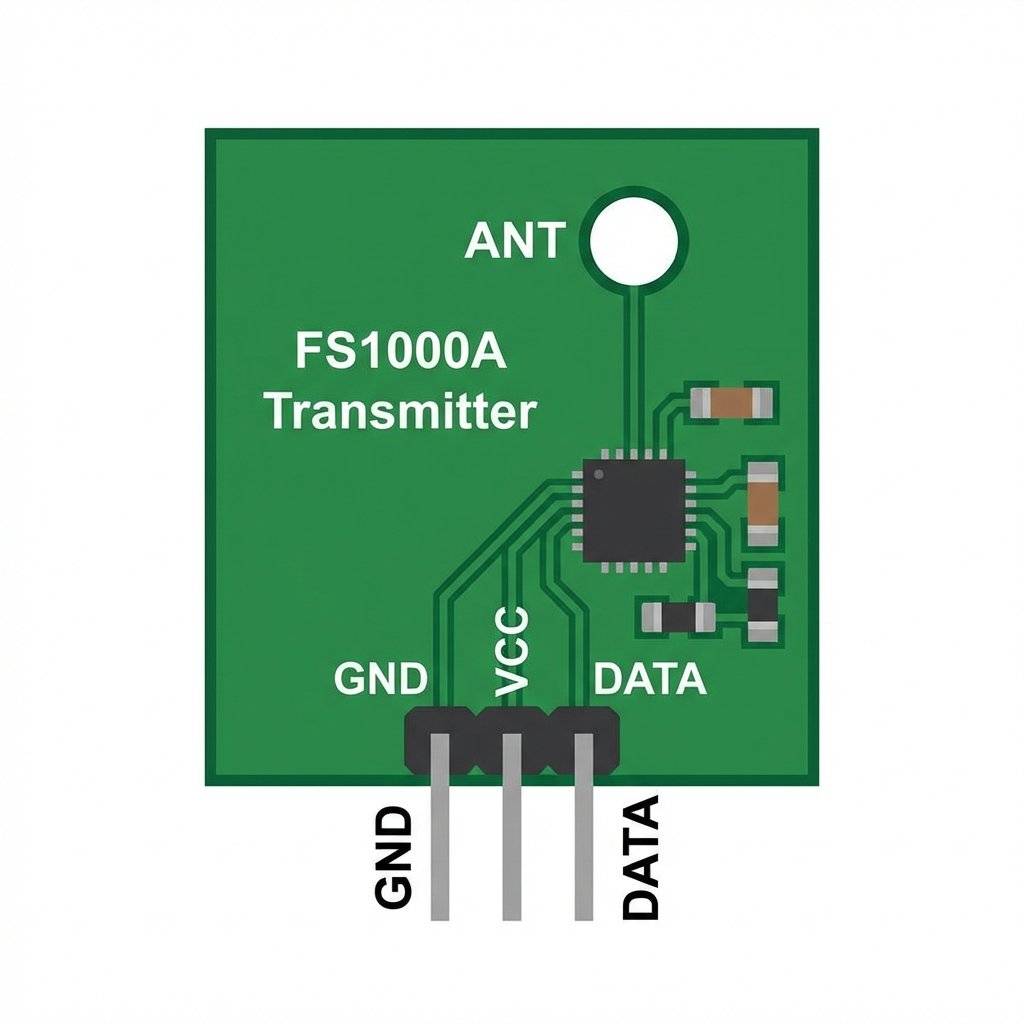
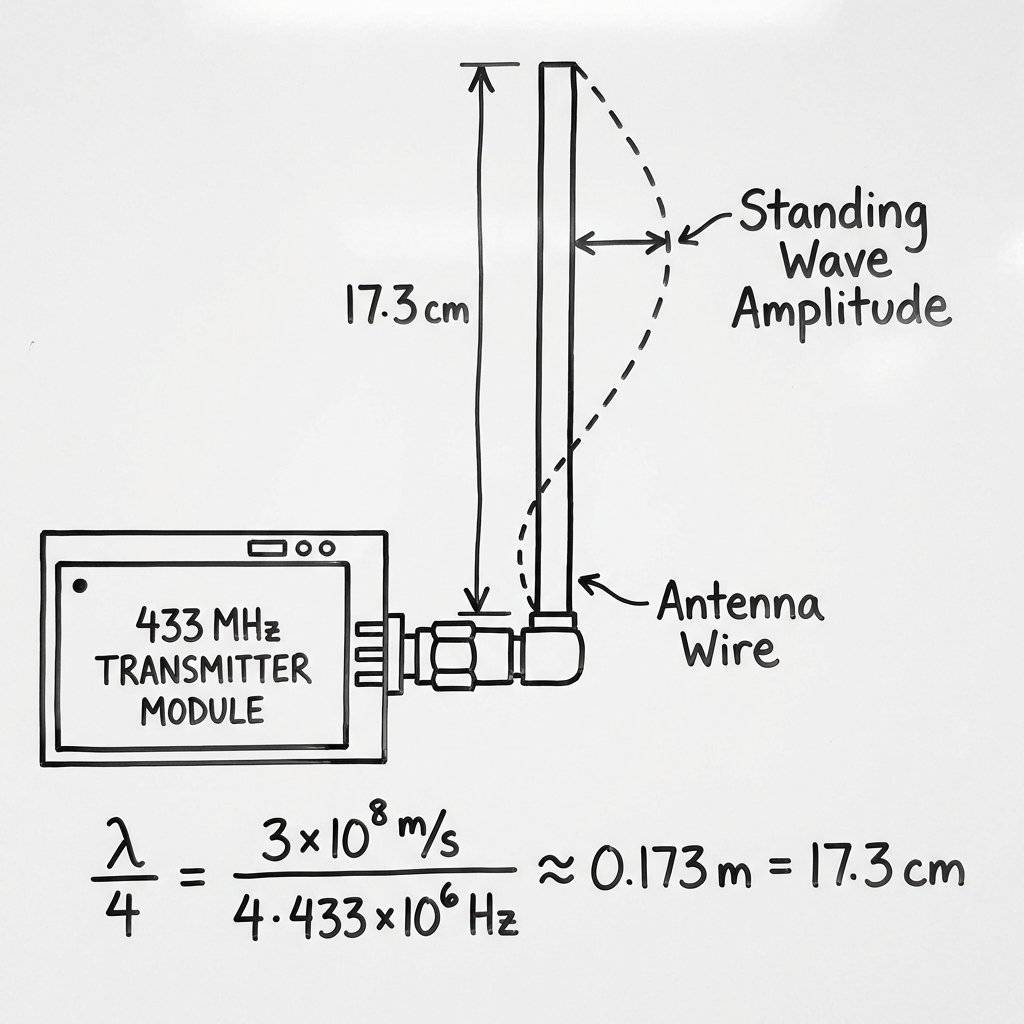
DO NOT IGNORE THIS SECTION. If you just plug these modules in, your range will be 20cm. You need an antenna. But not just any wire. You need a Quarter-Wave Monopole. The wavelength () of 433MHz is roughly 69.2cm. To create a standing wave resonance, we need a wire exactly 1/4th of that length.
Solder a solid-core wire effectively 17.3cm long to the ANT pad on both modules.
This instantly boosts your range from 20cm to 20 meters indoors.
You will see people coiling the antenna to save space. Do not do this unless you have to.
An antenna is only half the story. The other half is the Ground Plane. The radio wave pushes against the “Earth” (GND) to launch into the air. If your device is small and floating in plastic, it has a “weak ground”. Pro Tip: Connect a second 17.3cm wire to GND and point it in the opposite direction (forming a dipole). This can double your range again.
You might think: “Can I just clear Serial.print to the data pin?”
No.
Two reasons:
This is why we need a Protocol. We need a library to wrap our data in a packet with a “Preamble” (to wake up the receiver) and a “Checksum” (to verify clarity).

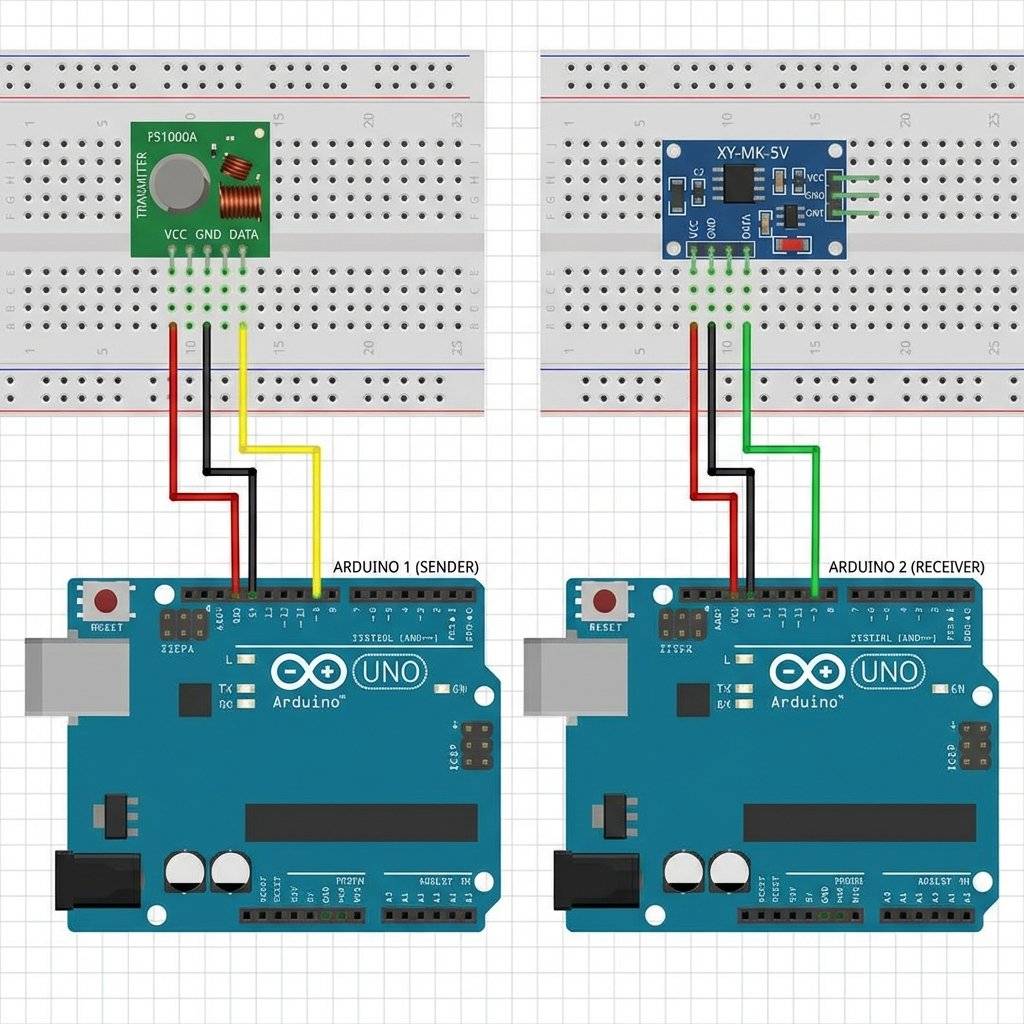
We need two Arduinos.
Sender Arduino: Connected to FS1000A.
Receiver Arduino: Connected to XY-MK-5V.
Sender Connections:
You must download the RadioHead library. It is often not in the Library Manager.
Download the ZIP from AirSpayce or use the RH_ASK class if included in newer managers.
This code sends the message “Hello World” every second.
#include <RH_ASK.h>
#include <SPI.h> // Not actually used but needed to compile

// Create ASK object
// RH_ASK driver(Speed, RX_Pin, TX_Pin);
RH_ASK driver(2000, 11, 12);

void setup() {
    Serial.begin(9600);
    if (!driver.init())
Serial.println("init failed");
}

void loop() {
  const char *msg = "Hello World";
  // driver.send(Data Array, Length)
  driver.send((uint8_t *)msg, strlen(msg));
  // Wait for packet to fully transmit
  driver.waitPacketSent();
  Serial.println("Message Sent");
  delay(1000);
}This code acts as a sniffer. It listens for valid RadioHead packets and prints them.
#include <RH_ASK.h>
#include <SPI.h>

RH_ASK driver(2000, 11, 12);

void setup() {
    Serial.begin(9600);
    if (!driver.init())
Serial.println("init failed");
}

void loop() {
  // Buffer to hold received data
  uint8_t buf[RH_ASK_MAX_MESSAGE_LEN];
  uint8_t buflen = sizeof(buf);
  // Default is non-blocking
  if (driver.recv(buf, &buflen)) {
    // Message Received with correct Checksum!
    Serial.print("Message: ");
    // Print character by character
    for (int i = 0; i < buflen; i++) {
      Serial.print((char)buf[i]);
    }
    Serial.println();
  }
}Sending text is boring. Let’s send Data.
We will define a struct (Structure) to package multiple variables (Temperature, Humidity, ID) into a single binary block.
This is the professional way to handle data.
struct WeatherPacket {
  int id;
  float temperature;
  int humidity;
};#include <RH_ASK.h>
#include <SPI.h>
#include <DHT.h>
#define DHTPIN 2
#define DHTTYPE DHT11
RH_ASK driver(2000, 11, 12);
DHT dht(DHTPIN, DHTTYPE);
struct WeatherPacket {
int id;
float temp;
int hum;
};
void setup() {
Serial.begin(9600);
dht.begin();
driver.init();
}
void loop() {
WeatherPacket packet;
packet.id = 1; // Sensor ID
packet.temp = dht.readTemperature();
packet.hum = dht.readHumidity();
// Send the struct as raw bytes
driver.send((uint8_t *)&packet, sizeof(packet));
driver.waitPacketSent();
delay(2000);
}
Look at this line:
driver.send((uint8_t *)&packet, sizeof(packet));
This is pointer arithmetic.
&packet: Memory address where the struct starts.(uint8_t *): Treats struct as raw bytes.driver.send: Sends bytes one by one.
On the receiver side, you do the opposite. You receive raw bytes and “cast” them back into the shape of the struct.
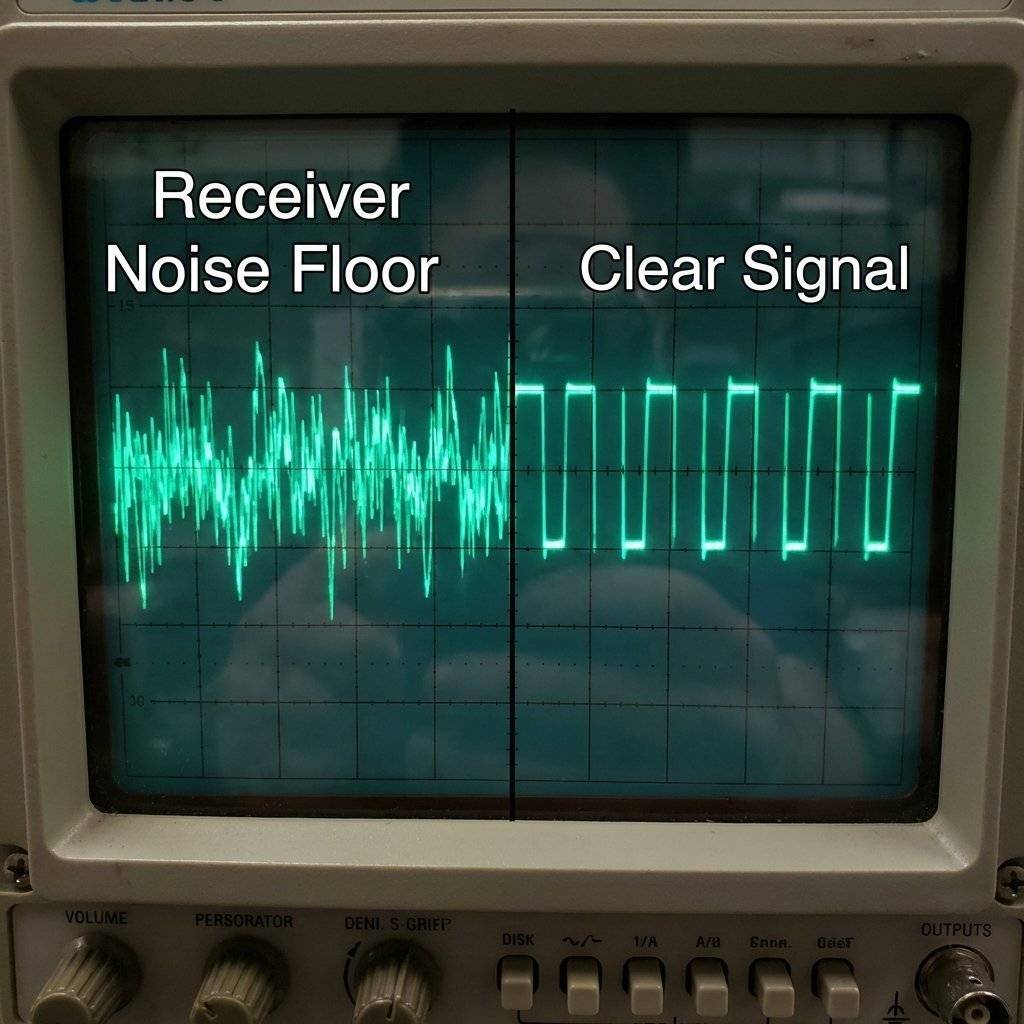
This is the most efficient way to send mixed data (Floats, Ints, Chars) in simple C++.If you open the Serial Plotter on the Receiver Pin without using the library, you will see chaos. This is the Noise Floor. In a city, 433MHz is crowded.
You have two Arduinos. Connect a computer to each. We can build a 2-Way Chat System.
The Logic:
Check Serial Input -> If yes, Transmit it.
Check Radio Input -> If yes, Print it.
Do both continuously.
The Code (Upload to BOTH Arduinos):
#include <RH_ASK.h>
#include <SPI.h>

RH_ASK driver(2000, 11, 12); // RX=11, TX=12

void setup() {
    Serial.begin(9600);
    driver.init();
    Serial.println("Chat Room Ready. Type a message:");
}

void loop() {
  // 1. Sending
  if (Serial.available()) {
    String msgString = Serial.readStringUntil('\n');
    // Convert String to char array
    char msg[50];
    msgString.toCharArray(msg, 50);
    driver.send((uint8_t *)msg, strlen(msg));
    driver.waitPacketSent();
    Serial.println("-> Sent");
  }
  // 2. Receiving
  uint8_t buf[RH_ASK_MAX_MESSAGE_LEN];
  uint8_t buflen = sizeof(buf);
  if (driver.recv(buf, &buflen)) {
    Serial.print("User2: ");
    for (int i = 0; i < buflen; i++) {
      Serial.print((char)buf[i]);
    }
    Serial.println();
  }
}
Congratulations, you just built a crude form of Wi-Fi.
| Component | Quantity | Value | Notes |
|---|---|---|---|
| Arduino Uno | 2 | Any | One for TX, one for RX. |
| RF Module Kit | 1 | 433MHz | FS1000A + XY-MK-5V. |
| Solid Wire | 2 | 17.3cm | For antennas. |
| DHT11 | 1 | Sensor | For weather station project. |
| Battery Pack | 1 | 9V-12V | For increased TX range. |
| Breadboard | 2 | Any | For prototyping. |
You have broken through the physical barrier of walls. Your Arduino can now shout through the house. This opens up the world of Home Automation. Garage monitors. Mailbox sensors. Outdoor weather stations.
Next Up: We connect to the ultimate network. The Internet. Tomorrow, we pick up the legendary ESP8266 (NodeMCU). We will connect to Wi-Fi, call an API, and pull live cryptocurrency prices from the web. See you on Day 29.

A complete, end-to-end guide on building a secure, scalable IoT device using ESP32, MQTT, and AWS IoT Core. We bridge the gap between software logic and hardware reality.
Read More →
WiFi barely reaches your driveway. LoRa reaches the next town. Master the SX1278 module, Chirp Spread Spectrum physics, and build a 5km range sensor network.
Read More →
Stop polling your server every 5 seconds. Learn why Professional IoT uses MQTT. Master Pub/Sub architecture, QoS levels, Retained Messages, and Last Will & Testament.
Read More →