From Code to Reality: Building a Production-Grade IoT Device
A complete, end-to-end guide on building a secure, scalable IoT device using ESP32, MQTT, and AWS IoT Core. We bridge the gap between software logic and hardware reality.
Read More →
* SYSTEM.NOTICE: Affiliate links support continued laboratory research.
If you started with Arduino, you probably use HTTP for everything.
HTTP GETHTTP POSTThis works for one device. It fails for one thousand. HTTP is Synchronous and Heavy.
Professional IoT uses MQTT (Message Queuing Telemetry Transport). It is Asynchronous, Lightweight, and Event-Driven. Today, we stop “Polling” and start “Streaming”.

In HTTP, you talk directly to the server. In MQTT, you talk to no one. You talk to a Broker.
The Magic: The Publisher does not know the Subscriber exists. They are Decoupled.

MQTT doesn’t use URLs. It uses Topics.
Topics are hierarchical strings separated by forward slashes /.
Examples:
home/kitchen/light/state (Payload: “ON”)home/kitchen/light/set (Payload: “ON”)factory/machine_1/temperatureWildcards (The Superpower): Subscribers can listen to patterns.
+ (Single Level): home/+/light/state (all lights).# (Multi Level): factory/# (all factory data).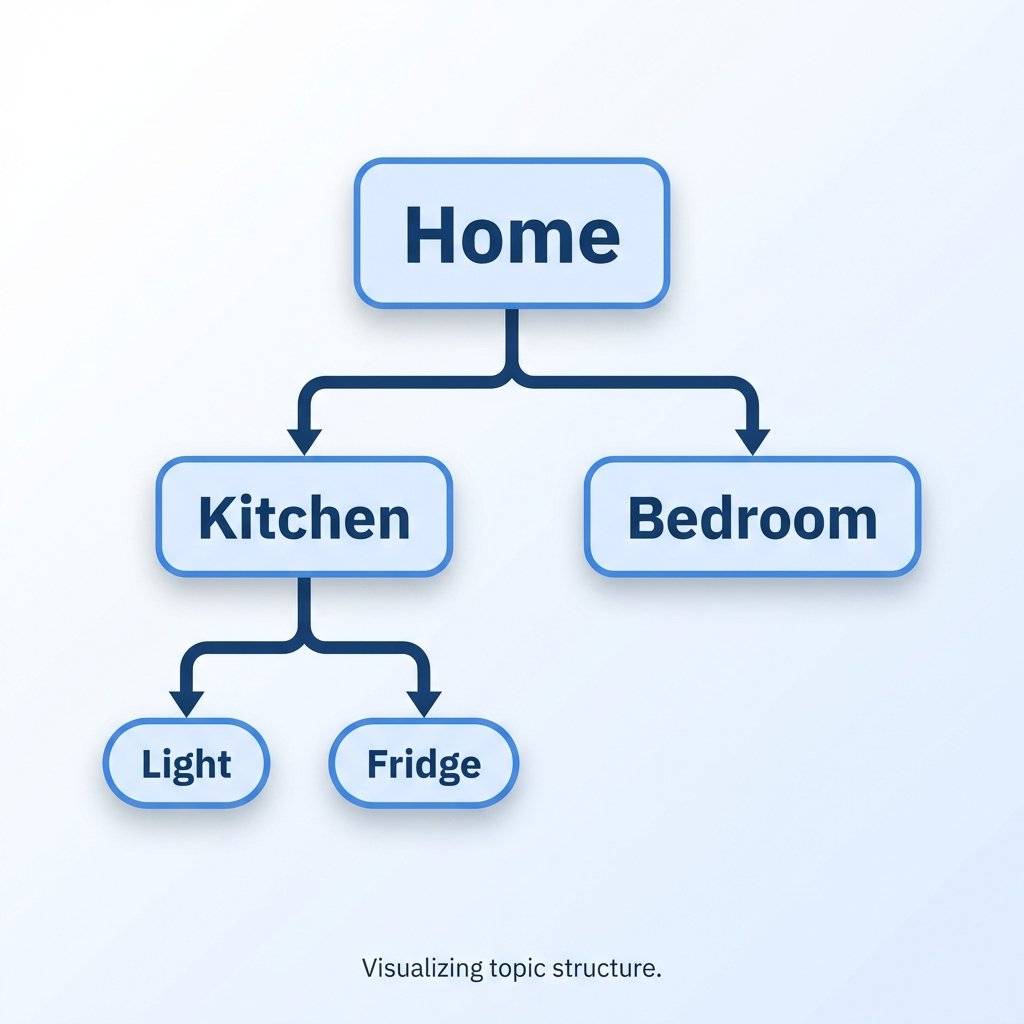
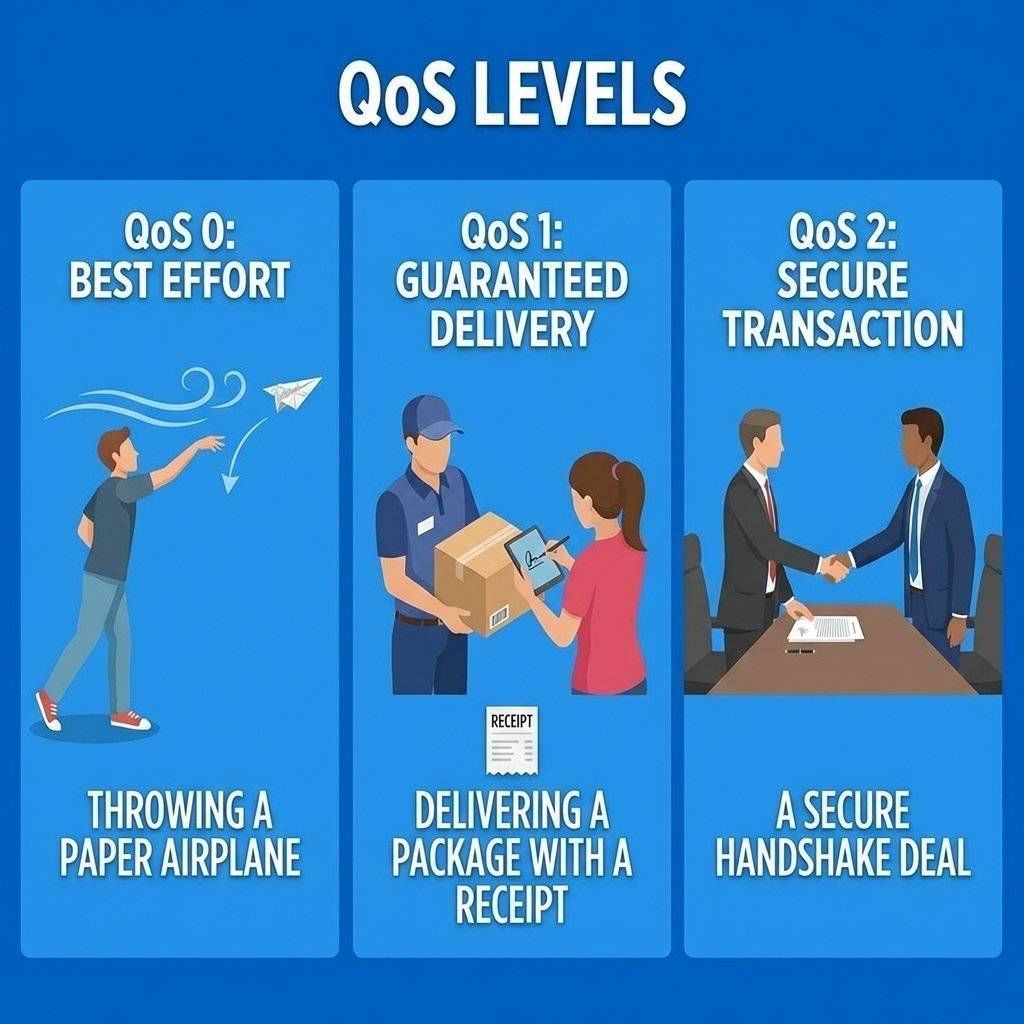
HTTP is “Best Effort”. If the internet drops, the request fails. MQTT has 3 levels of guarantee.
QoS 0: “At most once” (Fire and forget).
QoS 1: “At least once” (Guaranteed delivery, possible duplicates).
QoS 2: “Exactly once” (Bank-level guarantee).
These two features solve the biggest headaches in IoT.
Problem: You restart your phone app. The Light is ON, but your app says “Unknown” because it missed the message sent 1 hour ago. Solution: Flag the message as RETAINED. The Broker stores the last known value. When a new Subscriber connects, the Broker immediately delivers the retained message.

Problem: A sensor loses power. It disconnects silently. Your dashboard still thinks it is “Online”. Solution: When connecting, the Sensor gives the Broker a “Will”.
status/sensor1So, if someone pulls the plug, the Broker waits for the timeout, then tells everyone: “Sensor 1 is Offline”.

We need the PubSubClient library.
#include <ESP8266WiFi.h>
#include <PubSubClient.h>

const char* ssid = "WiFi_SSID";
const char* password = "WiFi_Pass";
const char* mqtt_server = "192.168.1.100"; // Address of Broker

WiFiClient espClient;
PubSubClient client(espClient);

void setup() {
  Serial.begin(115200);
  setup_wifi();
  // Connect to Broker
  client.setServer(mqtt_server, 1883);
  client.setCallback(callback); // Function to handle incoming messages
}

void reconnect() {
  while (!client.connected()) {
    Serial.print("Attempting MQTT connection...");
    // Create a unique client ID
    String clientId = "ESP8266Client-";
    clientId += String(random(0xffff), HEX);
    // Attempt to connect (With LWT!)
    // connect(clientId, mqttUser, mqttPassword, willTopic, willQoS, willRetain, willMessage)
    if (client.connect(clientId.c_str(), NULL, NULL, "home/sensor/status", 1, true, "Offline")) {
      Serial.println("connected");
      // I am alive! (Retained)
      client.publish("home/sensor/status", "Online", true);
      // Listen for commands
      client.subscribe("home/sensor/set");
    } else {
      Serial.print("failed, rc=");
      Serial.print(client.state());
      delay(5000);
    }
  }
}

void callback(char* topic, byte* payload, unsigned int length) {
  Serial.print("Message arrived [");
  Serial.print(topic);
  Serial.print("] ");
// Payload is a byte array, not a string!
  String message = "";
  for (int i = 0; i < length; i++) {
    message += (char)payload[i];
  }
  Serial.println(message);

  if (String(topic) == "home/sensor/set") {
    if (message == "ON") {
digitalWrite(LED_BUILTIN, LOW);
client.publish("home/sensor/state", "ON", true); // Confirm state
    } else {
digitalWrite(LED_BUILTIN, HIGH);
client.publish("home/sensor/state", "OFF", true);
    }
  }
}

void loop() {
  if (!client.connected()) {
    reconnect();
  }
  client.loop(); // Keep the connection alive
}You need a Broker.
Cloud: HiveMQ, Adafruit IO (Easiest).
Local: Mosquitto (Best for privacy/speed).
Installing Mosquitto (Linux/Raspberry Pi):
sudo apt update
sudo apt install mosquitto mosquitto-clients
Testing with CLI: Open Terminal 1 (Subscriber):
mosquitto_sub -h localhost -t "home/#" -v
Open Terminal 2 (Publisher):
mosquitto_pub -h localhost -t "home/kitchen/light" -m "ON"
You will see the message appear instantly in Terminal 1.
Debugging invisible messages is hard. Use MQTT Explorer (Desktop App). It visualizes the hierarchy of your topics. It shows you Retained flags. It lets you publish test packets manually. Professional Advice: Never build an MQTT system without this tool open on your second monitor.

Sending a single number is fine. But what if you have Temperature, Humidity, and Battery Level?
Do not publish to 3 separate topics (.../temp, .../hum, .../batt).
That causes 3 separate network packets. Wasteful.
The Solution: JSON (JavaScript Object Notation). Pack everything into one string.
{
  "temp": 24.5,
  "hum": 60,
  "batt": 85,
  "status": "OK"
}
Arduino Code (using ArduinoJson library):
#include <ArduinoJson.h>

void sendTelemetry() {
  StaticJsonDocument<200> doc;
  doc["temp"] = 24.5;
  doc["hum"] = 60;
  doc["batt"] = 85;
char buffer[256];
  serializeJson(doc, buffer);
// Publish ONE message
  client.publish("home/sensor/telemetry", buffer);
}
Now your Subscriber (Node-RED, Home Assistant) can parse this easily.
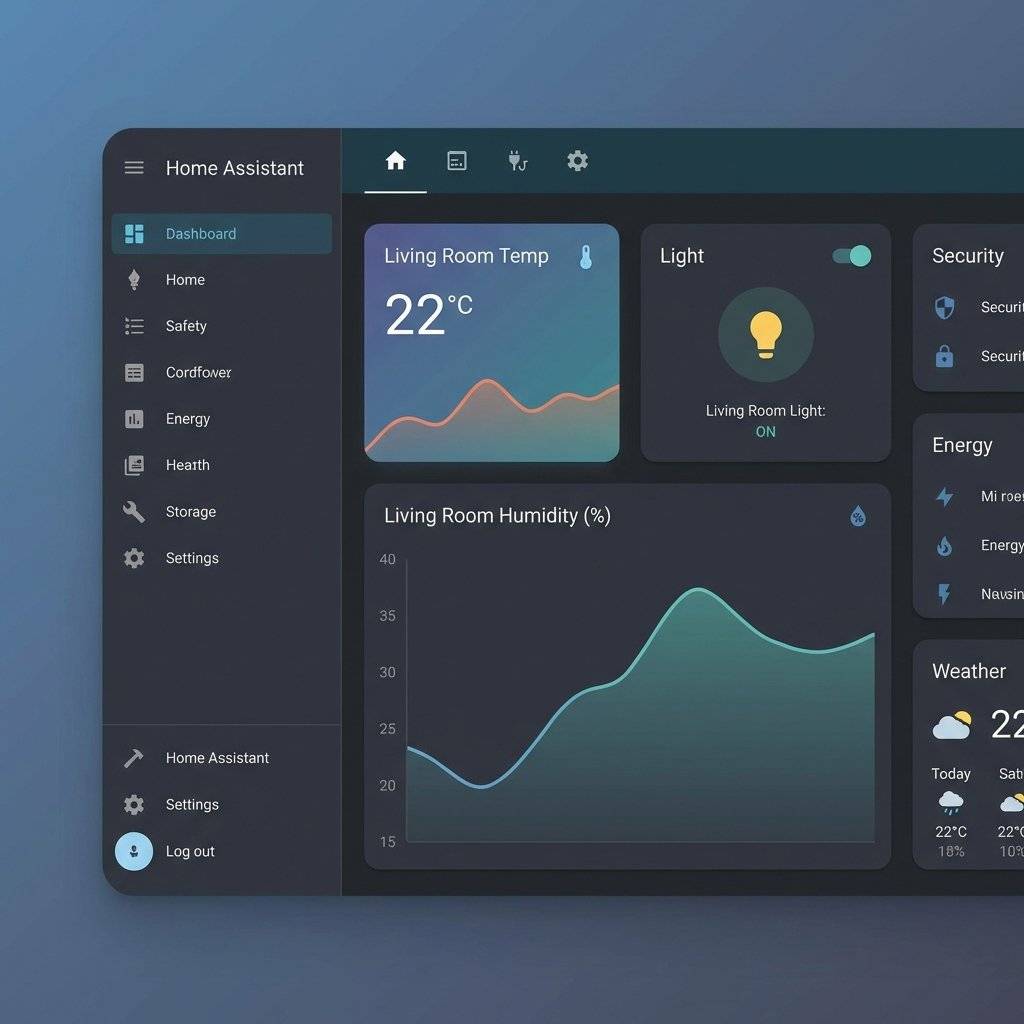
(Why we do this)
The end goal isn’t just to see text in a terminal. It is to see a Graphical Dashboard. Since MQTT is standard, you can connect your ESP8266 to:
Home Assistant: The gold standard. It has a built-in MQTT Broker. It auto-discovers devices.
Node-RED: A visual flow-based programming tool. Drag a “MQTT In” node, connect it to a “Gauge” node. Done.
Grafana: For long-term historical graphing of your temperature data.
The Flow:
Sensor (MQTT) -> Broker -> Node-RED -> InfluxDB -> Grafana
This stack is used by Fortune 500 companies. And you can run it on a Raspberry Pi.
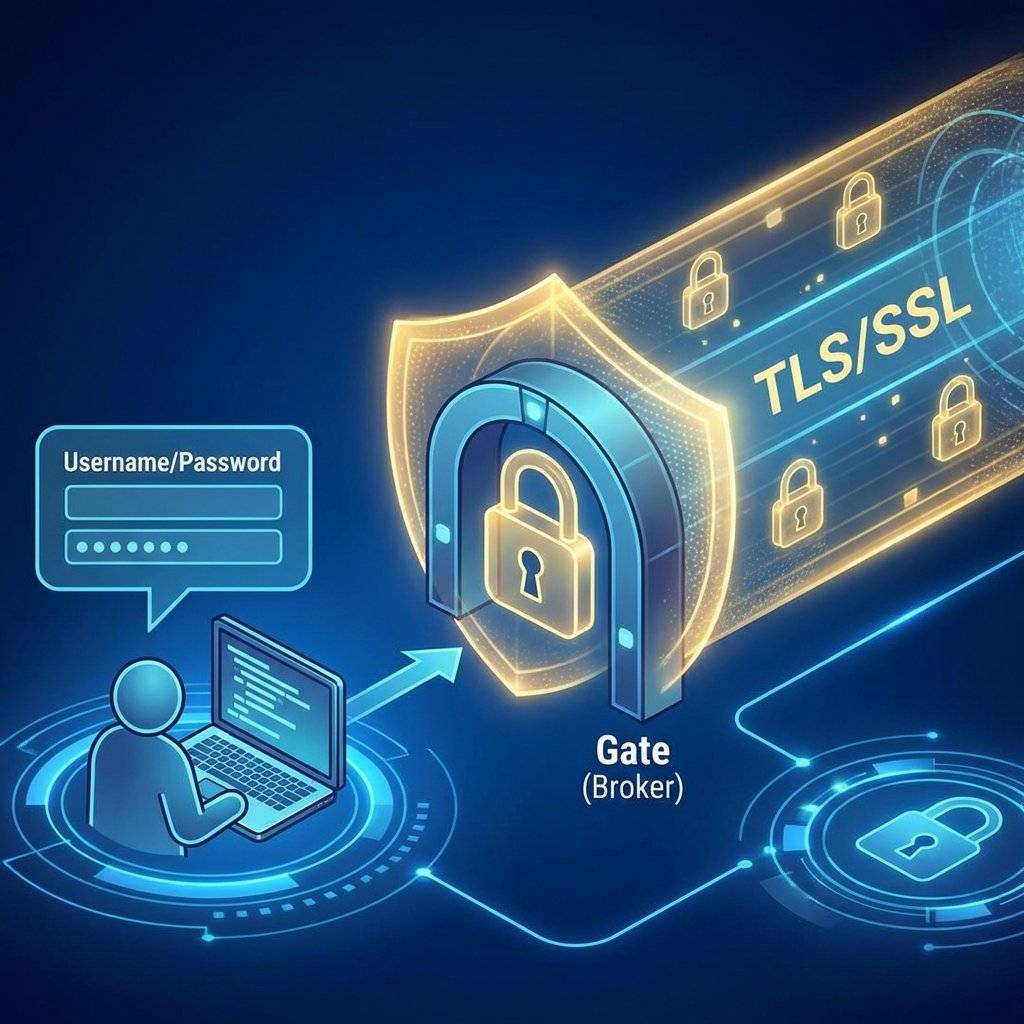
By default, MQTT is open. Anyone on the network can spy on your topics.
Authentication: Configure mosquitto.conf to require a username/password.
Encryption (TLS): If sending over the internet (Port 8883), use SSL/TLS certs. Otherwise, your passwords are sent in plain text.
ACLs (Access Control Lists): Restrict “Sensor A” to only publish to “topic A”.
HTTP is great for websites. MQTT is built for machines. It handles unstable connections, ensures data delivery, and decouples your architecture. Once you see your first LED toggle instantly over the internet with MQTT, you never go back to polling.
Copyright © 2026 TechnoChips. Open Source Hardware (OSHW).

A complete, end-to-end guide on building a secure, scalable IoT device using ESP32, MQTT, and AWS IoT Core. We bridge the gap between software logic and hardware reality.
Read More →
WiFi barely reaches your driveway. LoRa reaches the next town. Master the SX1278 module, Chirp Spread Spectrum physics, and build a 5km range sensor network.
Read More →
Run your IoT sensors for a year on a single coin cell. Mastering ESP8266 Deep Sleep, RTC Memory persistence, and the hardware hacks needed to achieve 20uA power consumption.
Read More →